You created a Supabase account, logged in, and now you’re staring at a dashboard filled with tabs labeled “table editor,” “SQL editor,” “authentication,” and “storage.” It feels like sitting in a cockpit with no flight training. Most founders freeze here, worried they’ll click the wrong button and break something expensive. The good news is that Supabase was built for people like you, and nothing you click will cost you money or delete your work. Learning to navigate the all-in-one toolbox for your startup starts with understanding what each section actually does for your business.
What you see when you first log in
The project dashboard is your home base
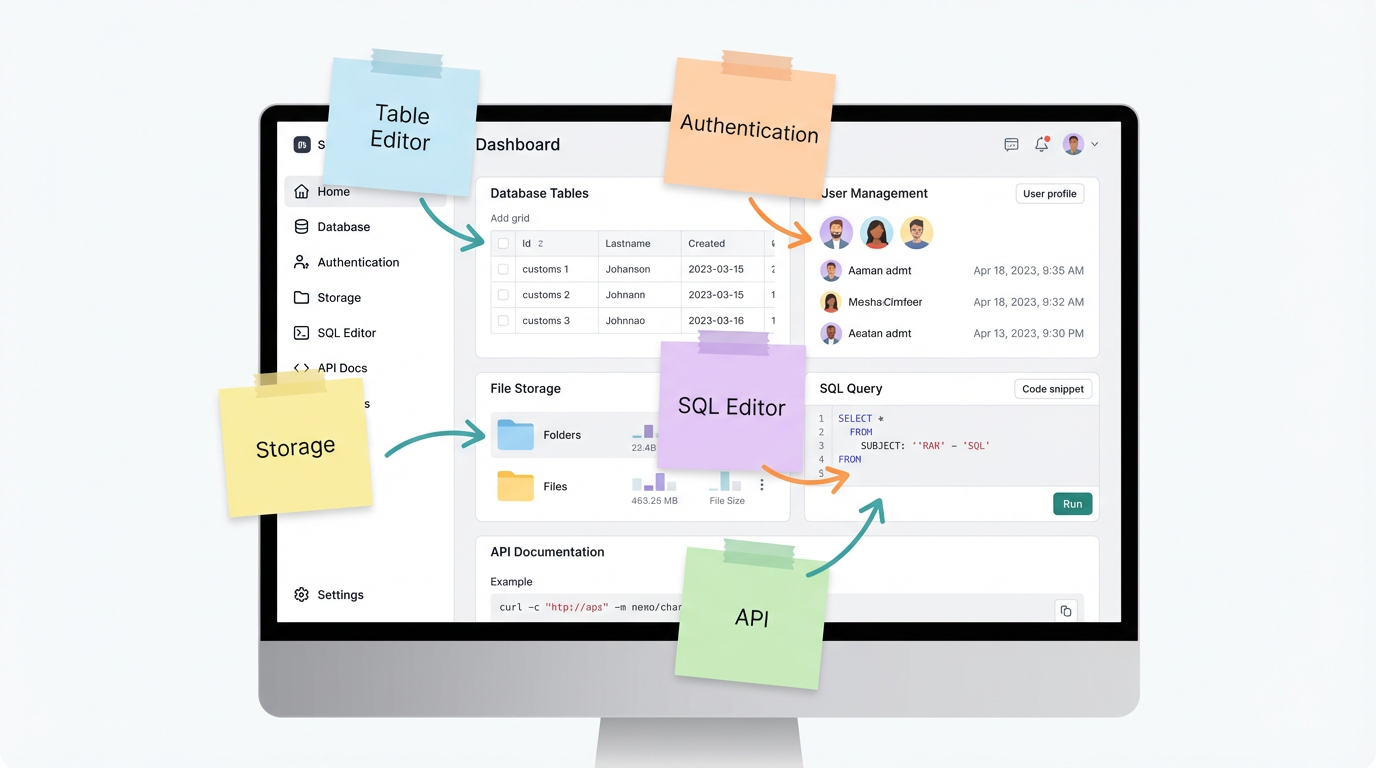
When you first log in, Supabase drops you into your project dashboard. This is the control center where everything lives. On the left sidebar, you’ll see a vertical menu with icons and labels for different sections. At the top, there’s a dropdown showing your project name, which is helpful if you end up managing multiple apps later.
The main area in the center shows your project’s health stats like database size, API requests, and active users. These numbers mean nothing on day one, but they become your daily check-in once you launch. Think of this dashboard like the manager’s office in a restaurant, you can see how busy the kitchen is, how many customers are being served, and whether anything is on fire.
The right side usually displays quick-start guides and documentation links. You can ignore these for now or bookmark them for later. Most founders learn by clicking around, not by reading documentation.
Your project URL is your app’s address
Near the top of the dashboard, you’ll see something called “project URL” or “API URL.” This is the unique web address where your app talks to Supabase. It looks like a random string of letters and numbers followed by “supabase.co.” You don’t need to memorize this, but you will need to copy and paste it into your app’s configuration file later.
Think of this URL like your business’s mailing address. Your website, mobile app, or any tool you build needs to know where to send data and where to fetch information from. That’s what this URL does.
Right next to it, you’ll see an “API key” section. These keys are like passwords that let your app access your database securely. Supabase gives you two keys by default: one for public use and one for admin-level access. Don’t share the admin key publicly, and don’t stress about understanding them deeply right now.
The table editor is where your data lives
Tables are just organized spreadsheets
Click on “table editor” in the left sidebar, and you’ll see either an empty state telling you to create your first table or a list of tables if you’ve already started. Tables are where all your app’s data lives: user accounts, product listings, blog posts, orders, whatever your business needs to track.
If you’ve ever used Excel or Google Sheets, you already understand tables. Each table has columns representing different types of information, like “name,” “email,” or “signup date.” Each row represents one record, like one user or one product.
The difference between a Supabase table and a spreadsheet is that tables have rules. You can enforce that email addresses must be unique, that prices must be numbers, or that every row must have a creation date. These rules prevent messy data from sneaking into your system and breaking things later.
Creating your first table takes 30 seconds
Click the “new table” button, give it a name like “customers” or “products,” and Supabase automatically creates a table with some default columns. You’ll see columns for “id,” “created_at,” and any custom columns you add.
The “id” column is a unique identifier for each row, like a serial number on a product. The “created_at” column automatically records when each row was added, which is useful for tracking when users signed up or when orders were placed.
You can add more columns by clicking “add column” and choosing a data type like text, number, date, or boolean (true/false). Don’t overthink this, you can always add, remove, or rename columns later without breaking anything.
Once your table exists, you can click into rows and edit data directly, just like editing a cell in a spreadsheet. This is incredibly useful for fixing typos, testing features, or manually adding sample data while you’re building.
Authentication is how users log in
The authentication tab handles all login logic
Click on “authentication” in the sidebar, and you’ll land on a page showing user accounts, login methods, and security settings. This is where you manage everyone who signs up for your app, from the first beta tester to your 10,000th paying customer.
Most founders assume authentication is complicated, involving passwords, encryption, security tokens, and server configuration. Supabase handles all of that automatically. You just decide how you want users to log in: email and password, magic links sent to their inbox, or social logins like “sign in with Google.”
The default setup uses email and password, which works fine for most startups. Users type their email, create a password, and Supabase stores everything securely. You never see their passwords, and you don’t need to worry about hashing, salting, or any of the cryptography that gives developers nightmares.
Social logins are one toggle away
If you want to let users sign in with Google, GitHub, or Apple, Supabase makes that shockingly simple. Go to the “providers” section under authentication, find the provider you want, and toggle it on. You’ll need to create an app in Google’s or Apple’s developer console and copy some credentials, but Supabase walks you through it step-by-step.
Social logins boost conversion rates because users don’t need to remember another password. They click “sign in with Google,” authorize your app, and they’re in. That friction reduction can be the difference between someone signing up or bouncing from your landing page.
Most successful consumer apps use social logins as the primary option and email/password as a backup. Business apps tend to prefer email/password for control and compliance reasons. Choose what makes sense for your audience.
Storage is your digital filing cabinet
Where uploaded files actually go
Click on “storage” in the sidebar, and you’ll see a file management interface that looks similar to Google Drive or Dropbox. This is where user-uploaded files live: profile photos, product images, PDF invoices, video content, anything that isn’t plain text or numbers.
Storage is organized into “buckets,” which are like top-level folders. You might have one bucket for user avatars, another for product images, and another for private documents. Buckets let you apply different security rules to different types of files.
For example, profile photos might be publicly accessible so anyone can see them, while PDF invoices are private and only visible to the user who uploaded them. Supabase lets you configure these rules per bucket without writing complex code.
Uploading and organizing files is drag-and-drop simple
Inside any bucket, you can manually upload files by dragging them from your computer or clicking the upload button. This is useful for seeding your app with sample content or adding assets before launch.
Each file gets a unique URL that you can reference in your app. When a user uploads a profile photo, Supabase stores it in the bucket, generates a URL, and your app saves that URL in the user’s database record. Later, when you need to display the photo, you just load that URL like any other image on the web.
File size limits depend on your pricing tier, but the free tier allows files up to 50mb, which covers most use cases. If you need to store massive video files or high-resolution design assets, you’ll eventually need to upgrade or use a specialized service like Cloudflare R2.
The SQL editor is your power tool (optional)
When point-and-click isn’t enough
Most of the time, you’ll use the table editor to view and edit data. But occasionally, you’ll need to do something more advanced like bulk updating hundreds of rows, running reports, or setting up complex relationships between tables. That’s when you open the SQL editor.
SQL stands for “structured query language,” and it’s the way you talk directly to your database using text commands. It sounds intimidating, but Supabase includes a library of pre-written SQL snippets for common tasks. You can copy, paste, and modify them without learning SQL from scratch.
For example, if you need to delete all test accounts created before a certain date, you can use a SQL snippet that says “delete from users where email contains ‘test’ and created_at is older than January 1st.” Click run, and it happens instantly.
You can learn as you grow
Here’s the good news: you don’t need to touch the SQL editor on day one. You can build, launch, and grow your startup to thousands of users without writing a single SQL query. The table editor and API handle 90% of what most founders need.
But as your app matures, you’ll eventually want to run analytics, generate reports, or automate data cleanup. That’s when you’ll start exploring SQL, and Supabase’s editor makes it less scary than learning from a textbook.
Think of SQL like learning Excel formulas. You start with simple stuff like SUM and AVERAGE, and eventually, you’re writing complex nested formulas that save hours of manual work. SQL follows the same progression.
The dashboard is your window into everything Supabase can do, but understanding what each section is for becomes much clearer when you see how the pieces connect as a complete backend system. The table editor, authentication tab, storage, and edge functions aren’t isolated tools — they’re the same features covered in depth in The Entrepreneur’s Guide to Supabase, which explains not just what each section does but why it matters for your startup and when to use it as your business grows.
API settings connect your app to Supabase
Your app needs these settings to communicate
Click on “settings” and then “API” in the sidebar, and you’ll see the technical details your app needs to connect to Supabase. This includes your project URL, API keys, and connection strings. Most founders copy these values once during initial setup and never look at them again.
If you’re working with a developer or using a tutorial, this is where they’ll tell you to grab your “anon key” or “service role key.” The anon key is safe to use in public-facing code like websites or mobile apps. The service role key has admin privileges and should only be used in secure backend scripts.
These keys let your app read and write data, upload files, and authenticate users. Without them, your app is like a phone without a SIM card, it exists but can’t connect to anything.
Rate limits and usage monitoring live here too
Under the API settings, you can also see rate limits, which control how many requests your app can make per second. The free tier has generous limits for most startups, but if you’re building something that syncs data constantly or handles millions of requests, you’ll need to monitor this.
Supabase shows you real-time API usage stats, so you can spot problems before they become outages. If your app suddenly starts making 10,000 requests per minute, either you’ve gone viral or something is broken. Either way, you’ll know immediately.
Understanding your API settings isn’t about memorizing technical jargon, it’s about knowing where to look when your developer asks for credentials or when you need to troubleshoot connection issues.
What clicking around won’t break
Supabase is built for exploration
One of the biggest fears new founders have is that they’ll click something, break their database, and lose everything. That fear keeps people paralyzed, staring at the dashboard without actually building anything.
Here’s the truth: Supabase is designed for people like you, and it’s nearly impossible to accidentally destroy your work. Creating tables, adding columns, uploading files, or editing rows are all reversible. If you delete something by mistake, you can recreate it in seconds.
The only truly destructive action is deleting your entire project, which requires you to type the project name as confirmation. Everything else is safe to experiment with.
The worst that happens is you start over
Let’s say you create a messy table structure, upload the wrong files, or configure authentication incorrectly. The worst-case scenario is you delete the table or bucket and start fresh. You’re not paying for anything on the free tier, so there’s no financial risk. You’re not serving real users yet, so there’s no downtime.
Treat your first Supabase project like a sandbox. Click every button, create test tables, upload sample files, and try enabling different authentication providers. The more you explore now, the more confident you’ll feel when you’re building something real.
Most founders waste weeks overthinking their backend setup when they could’ve spent that time actually building and learning. Supabase removes the cost of mistakes, so make them early and often.
If you’re ready to move beyond exploring and start protecting your data properly, learning how Supabase security works ensures your users’ information stays private from day one.
About the Author

AISalah
Bridges linguistics and technology at PointOfSaaS, exploring AI applications in business software. English Studies BA with hands-on back-end and ERP development experience.
Did you find this helpful?
Your feedback helps us curate better content for the community.